Junior Overachievment
If you have a problem with persistant and perhaps intermittant overcharging, and have checked all the wiring and replaced the regulator to no avail - here's one more thing to try before pitching the alternator into the trash.
Over the years, I've had several Lucas alternators develop overcharging problems. The symptoms were intermittant, and all bench tests could find nothing wrong. I would put the alternator back on the car, and everything would be OK for about a week before the voltmeter became pegged again. Finally, it became a test of will and a matter of principle - the principle being that I was too cheap to replace another expensive alternator without being certain that I really had to.
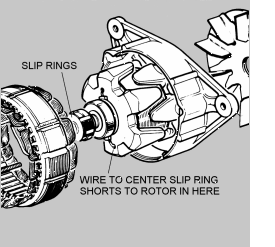
 After much poking and peering with magnifiers and meters, I finally found the problem. The the rotor winding wire has thin enamel insulation. It passes through two holes in the rotor frame on its way to the slip rings. There should be insulating sleeves surrounding the wire to protect from chafing as it passes through the holes. Sometimes a sleeve is missing, too short or placed in the wrong spot. The wire is moved around by centrifugal force and thermal expansion, and eventually shorts to the rotor frame. If the wire leading to the outer slip ring shorts to the rotor, the alternator output dies and diodes may blow. If the wire to the center slip ring shorts, the regulator is effectively bypassed and the voltage rises to battery boiling levels. After much poking and peering with magnifiers and meters, I finally found the problem. The the rotor winding wire has thin enamel insulation. It passes through two holes in the rotor frame on its way to the slip rings. There should be insulating sleeves surrounding the wire to protect from chafing as it passes through the holes. Sometimes a sleeve is missing, too short or placed in the wrong spot. The wire is moved around by centrifugal force and thermal expansion, and eventually shorts to the rotor frame. If the wire leading to the outer slip ring shorts to the rotor, the alternator output dies and diodes may blow. If the wire to the center slip ring shorts, the regulator is effectively bypassed and the voltage rises to battery boiling levels.
The really infuriating thing about this is that the problem often does not show up until the alternator has been running for several minutes - long enough for the wire to expand enough to short to the rotor. That means a faulty alternator traded in as a core and rebuilt may test OK, even if the rotor hasn't been rewound. The "new" alternator w ill be sold to someone else, and fail shortly. It will go back, test OK, perhaps be rebuilt and sold again, ad nauseum.
Fixing it is an iffy thing, but it's easy to try. Remove the back cover for access to the rotor. Use a small screwdriver to center the offending wire in the hole. Pushing it into the hole a little may help move it away from contact with the wall of the hole. Check with an ohmmeter to be sure the short is gone. Squirt some paint or thin adhesive onto the hole and tilt the alternator to encourage it to run down into the hole, providing insulation. Let it dry thoroughly, reassemble and take a drive.
 Wedges also have some alternator problems that are not caused by the alternator... Wedges also have some alternator problems that are not caused by the alternator...
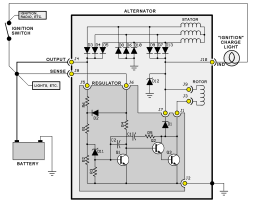
If your voltage is low until the engine is revved up above 1000 RPM or so, make sure the "IGN" light in the dash is OK. The alternator needs a moving magnetic field to generate current and the residual magnetism in the iron parts of the rotor is not strong enough to get things going at initial startup without a little help. The alternator rotor draws some current through the "IGN" bulb to kick-start its magnetic field. Once the alternator starts putting out current, some is sent back to the rotor to create a much more powerful magnetic field. The bulb now has 12 volts on each end, so it goes out. If the bulb is burned out, disconnected or has been replaced with a lower wattage one that draws less current, it won't give the rotor the help it needs starting up. Using the wrong bulb seems to be fairly common.
Another common charging problem on TR8s is caused by a bad connection for the voltage sense wire. The battery is in the trunk while most of the circuits in the car are powered from a tap on the starter wire. The tap is in the passenger compartment near the right kick panel. Large currents drawn by the fans, lights, etc. would cause the system voltage to fluctuate badly if the alternator regulator monitored the voltage right at the alternator output. By moving the regulator sense wire to the point where most of the load was connected, Triumph engineers reduced the likelihood of blowing up the car's somewhat fragile electronics and improved battery charging.
Unfortunately, the connection between the sense wire and the main cable is not trouble free. The connector can fatigue and loosen and sometimes it corrodes. If the connector develops a somewhat high resistance, the regulator is fooled into thinking the alternator output is low and raises the voltage to dangerous levels. If the connector resistance becomes very high or the sense wire becomes disconnected, the alternator output drops dead. The situation was bad enough that Triumph issued a Technical Service Bulletin suggesting the sense wire be moved to the main cable termination at the starter solenoid. Ouch!
Here are some posts mostly about TR8s from the TR7/TR8 mailing list:
From: Dale, Tallahassee Florida
The alternators that most people use for TR7 and TR8 swaps are the Delco 10SI and 12SI units. These were arguably the most widely used and most reliable units ever produced, and can be bought anywhere. When I want to get one, I just tell them to give me an alternator for a '79 Olds Cutlass with A/C. That should get you a 63 amp alternator of the correct configuration (you can pick most any GM car from the era ('74? - '85?), just be sure to specify A/C and 63 amps).
You can also go with the chrome or powder-coated, usually 1-wire, jobbers from speed shops. Additionally, 80- and 100-amp rebuild kits that bolt right in run around $20 - $30. Fabbing brackets is pretty easy. I've put these into Triumphs, '60's Fords, '70's Fords, and will be moving the one on my Buick V6 to tuck it down away from the hood.
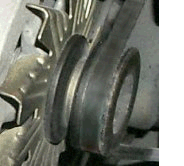
 Editor's note: If you want to install a cheap Delco without making brackets or sawing a chunk out of the new alternator, make sure you get a Delco alternator with twin pulleys (perhaps a DL712 7M). The mounting tab on the Lucas alternator is bolted to the front of the engine bracket. The Delco tab must be bolted to the back, so the front pulley of the pair is the one that lines up with the other engine pulleys. You may need a longer adjustment strut, installed with spacers. If you have a single pulley Delco laying around, you may be able to saw a chunk out of the front of the thick mounting tab, moving the whole thing forward. Editor's note: If you want to install a cheap Delco without making brackets or sawing a chunk out of the new alternator, make sure you get a Delco alternator with twin pulleys (perhaps a DL712 7M). The mounting tab on the Lucas alternator is bolted to the front of the engine bracket. The Delco tab must be bolted to the back, so the front pulley of the pair is the one that lines up with the other engine pulleys. You may need a longer adjustment strut, installed with spacers. If you have a single pulley Delco laying around, you may be able to saw a chunk out of the front of the thick mounting tab, moving the whole thing forward.
From: A List Member Whose Name I Have Lost
I have swapped the early Delco (late 70's/early 80's) which requires fabricating a bracket, but recently swapped in a later Delco, believe its called a CD 130. (Don't hold me to that.) Its common to later GM cars. It bolts right up, but haven't yet managed to get the idiot light to light, even though I have the trigger hooked up. So far just a 2 wire hookup.
From: Richard T.
You can use a GM rebuilt alternator for $30 from any auto parts store that is 100 times better than the stock Lucas unit.
It bolts right up, and there is a wiring harness you buy at the auto parts store that hooks into your stock harness with minor snipping here and there. The Alternator to use is one from a 305 V-8 Camaro with air conditioning. Just hit google, and Lucas + Delco + Alternator + Swap and you'll find plenty of instructions and directions on how to make the swap easy and fast.
I did this to my TR8 last year and it has worked perfectly ever since. The lights are brighter. And it was much cheaper.
From: Greg G.
I have received many inquiries on the Lucas to Nissan alternator conversion I referred to in answering Mark Tinker's wiring question on the Lucas 25 ACR unit. Here are the details:
I have recently finished this conversion from the Lucas 25 ACR alternator using a 1983-85 Nissan Pulsar 60 Amp alternator boxed with the MPQ label, part number 14652. This is a bolt in replacement only requiring fabrication of a plain steel bushing added on the belt end mounting ear and a flanged bushing added on the terminal end mounting ear. This is necessary because Nissan used 10mm bolts where Triumph uses 8mm. The flange takes up the difference in the spacing of the two mounting ears. (I needed to add .260 inch.) All of the original mounting hardware was retained.
Since the mounting ears are placed differently, I had to make a new adjustment bar 1.5 inches longer and change to a slightly shorter belt, part number 45013 (15450DR). The pulley that comes with this unit is the same size as the 25 ACR pulley. Pulley alignment is also correct when mounted like the Lucas unit.
The battery lead reconnects to a similar stud. The Nissan ignition and volt sensing terminals are both stab on quick connections. They are in the shape of a tee. The vertical part of the tee is the ignition terminal connected to the ignition switch through the dash mounted charge indicator bulb (IGN). This lead previously was on the small stud on the Lucas alternator. The horizontal part of the tee is the voltage sense lead. This lead previously plugged into the recessed connection on the Lucas alternator.
I retained all the original wire terminals. To do this I made a bracket to hold a terminal strip with two positions. I used the bolt on the body side of the engine ground strap as the mounting point for this bracket. The original wires attach to this strip with matching connections and then two new single wires go to the new alternator and attach with single stab on connectors.
Now, I have an alternator that sells for under $75 and is found "on the shelf" at most auto parts stores. The volt gauge now registers a good reading. The dash IGN light functions normally. I am totally satisfied with the fit, function and appearance of this unit.
Editor's note: You can also use a Lucas alternator from a TR7 if the long housing bolts are removed, the housing is rotated and the bolts are replaced. The non-A/C TR7 alternator is really too wimpy to work properly in a TR8 with A/C or fuel injection, but the unit from an air conditioned TR7 works fine in my EFI + A/C TR8.
|
