I'm pretty certain that the top two questions asked by owners of old english cars are
"What's wrong with my alternator?" and
"Why is my car overheating?"
Since the temperature gauge in a TR7 or TR8 is not marked in degrees, it makes troubleshooting that much more difficult -
Is the car really overheating, or is the gauge wrong? Since there have been no published numbers to compare the gauge and sender against,
you may feel forced to replace them, just in case, before moving on to the other parts of the cooling system. Then once you do, you may find that the
temperature gauge readings do change... but not for the better.
Don't worry. The original sender has been discontinued and its replacement doesn't quite match. I hope you're not surprised.
 Some time back, Tim Buja did some tests on the original sending unit (which was also used in the Stag).
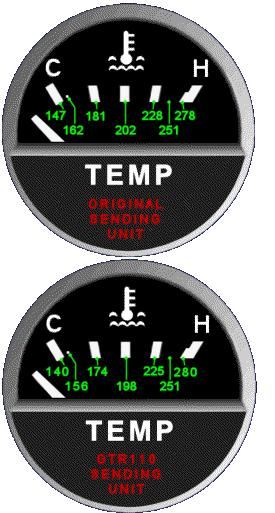
More recently I did tests on the GTR110 replacement sender and the gauge itself.
The old and new sensors match where it matters, at 3/4 scale and above. No extra 'adjustment' resistance
is required or desired. It's certainly possible to use the wonders of microelectronics to make the before and after
readings match across the scale, but I doubt that it's really worth the effort.
For my tests, I dug up an new GTR110 temperature sending unit and a used TR8 temperature gauge.
I filled a coffee can with corn oil and put it on a hotplate, then took it into the WedgeLab and hooked the sending unit and a type-J
thermocouple to my trusty HP 3497A data acquisition unit and PC and plunked 'em into the oil. I used oil so I could test above 212 degrees.
The sending unit results are shown in the graph above. I translated the data into the actual gauge readings, shown below.
 To test the gauge I used a good power supply and a bunch of resistors. The ROM says the gauge is immune to voltage
fluctuations, and I found that's pretty much true. If the gauge needle was at about half scale, varying the "battery voltage" between 9
and 15 volts only made the needle move about a quarter of its width.
I used various resistors in place of the sending unit to determine the gauge calibration.
You can easily check your gauge calibration by unplugging the sensing unit and substituting the resistors listed below between
the sender wire and a good ground point on the engine. You can combine several 'standard' resistors (available at Radio Shack, etc.) together to get
the exact values required. There are many free resistor-value calculators posted on the Web. Or just look up the formulas and use a pencil.
150 ohms = little dot just above "C"
105 ohms = 1/4 scale mark
71 ohms = 1/2 scale mark
45 ohms = 3/4 scale mark
20 ohms = little plateau before "H"
If your gauge used to hover between 3/8 and 5/8 you will find that the GTR110 sender does cause it to read a little hotter - maybe an eighth?
The 'caution' point where the TR8 leaves the normal operating zone is about the 3/4 mark, and both senders match pretty closely there, so you don't have to
recalibrate your mental panic button.
Here are some temperatures of note for a TR8 with electric fans according to the ROM:
Thermostat fully open at 190F
Low speed fan radiator switch turns on at 199F
High speed fan manifold switch turns on between 216F and 226F
Here is an interesting post to the TR8 mailing list:
From :     Bill S.
Sent :     Wednesday, July 27, 2005 6:37 AM
Subject :  Temperature Measurments
I checked my 2 TR8s Temp gage back in 2000 and put the info in the TR8CCA
newsletter Issue 57 page 9.
I used a Taylor Digital Meat thermometer. You can buy them at
Supermarkets in the kitchen utensil Aisle $15-20 bucks. I put it in boiling water and
it read 211 degrees, close enough for me!
I bought a plastic piping/tubing Tee and took the small return line off
the expansion tank and rigged the digital thermometer into this line. Get a
plastic Tee that fits this smaller appox 3/8" hose on the expansion tank
put the tee into the line and put a hose on the extra end and stick
another smaller rubber hose inside and then push in the digital thermometer and
you can use a worm drive clamp to keep the thermometer tight. Lot cheaper
than infrared and measures the actual coolant temperature.
Here are the reading I put in the newsletter.

1/4  on gauge    175-185
1/2  on gauge    200-210
3/4  on gauge    215-225
H    on gauge    270-290

